
Spatiotemporal Gait Collection
1. Setting up the camera
2. Checking the lighting
3. Adjusting the camera level
- Place your camera on a standard tripod a few feet in front of your arena so that is captures the saggital and ventral view of the animal.
- Set up your camera to record at a minimum of 250 frames per second (FPS)
- Our lab typically records at 500-1000 FPS
- Digitization errors as a function of camera recording speed are described in our prior work. See, Kloefkorn HE, Pettengill TR, Turner S, Streeter K, Gonzalez-Rothi E, Fuller D, and Allen KD (2017), “Automated Gait Analysis Through Hues and Areas (AGATHA): a method to characterize the spatiotemporal pattern of rodent gait.” Annals of Biomedical Engineering. Mar;45(3):711-725.
- If possible, you may want to set up a post-trigger system to save the last 4-6 seconds of recorded video.
2. Checking the lighting
- Take a picture of an animal in the arena with your lights on.
- Check if the RGB values are similar across the entire image.
- Use the Matlab colorThresholder tool to test different filters to check if the lighting is sufficient. Filters should be able to distinguish the rat from the background, and the rat body from the rat feet.
3. Adjusting the camera level
- Height
- Place an object, such as a roll of tape, inside the animal enclosure on its side and centered.
- Our lab uses a roll of tape, and its circular shape helps to verify that the camera is placed correctly.
- Our lab uses a roll of tape, and its circular shape helps to verify that the camera is placed correctly.
- The camera is at the right height if the entire object is visible (i.e. a complete circle for a roll of tape).
- Also, insure there is no reflection on the glass.
- The camera is too low if the bottom of the object is cut off.
- The camera is too high if you can see the object’s reflection on the arena floor
- Place an object, such as a roll of tape, inside the animal enclosure on its side and centered.
- Forward/Backward Tilt
- If the entire object is not perfectly visible in the front or back of the animal enclosure, adjust the camera until no reflection or no part of the object is missing.
- Move the object all the way to the back of the animal enclosure. Check is there is a reflection or if the bottom of the object is missing.
- Place the object all the way to the front of the animal enclosure. Check if there is a reflection or if the bottom of the object is missing.
- Left/Right Tilt
- Adjust the camera until these y-values are within three pixels of one another.
- Move the cursor to the right side of the selected straight edge and look at the y-value of the pixel again.
- Hover the mouse cursor over the selected straight edge on the left side and look at the Y-value of the pixel on the bottom of the screen.
- To adjust the camera to the left/right identify a straight edge (e.g. the arena floor) on the video image.
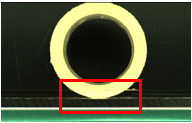
Camera Too High
|
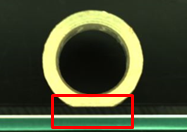
Camera Too Low
|
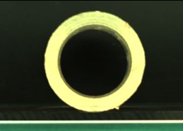
Good camera height
|
4. Adjusting animal enclosure placement
5. Calibrating the camera
6. Collecting gait data
7. Cleaning up
- While looking at the live video, move the animal enclosure until the back wall is just barely out of view in the mirror.
- The front wall of the animal enclosure should be slightly off the ground so there is a clear sight line of the animal’s feet.
5. Calibrating the camera
- Place a 1 cm grid paper inside the animal enclosure, face down so that the numbers are seen in the mirror reflection.
- Focus the camera on the numbers on the grid.
- Take a short video of the grid.
6. Collecting gait data
- Prior to data collection, acclimate the animals to the arena by placing them in the arena for about 15 minutes for 3-5 days. When acclimating, have the room set up as you would for data collection days (e.g. turn on all the lights, have the room quiet), but you do not need to collect any data. You can use acclimation days to practice data collection, if desired.
- On actual data collection days, set up the camera and force platforms as previously described. The testing room should be quiet, so as not to distract the animal.
- Weigh the animal before placing it in the arena and record the weight in your notebook.
- Write down the time you placed the animal in the arena.
- Place the animal on one side of the arena. Be ready to record once the animal is placed in the arena.
- Wait for the animal to walk across the screen. Have patience. If the animal is not walking, you can try to induce the animal to move, but this should be a last resort. Inducing walking does alter the animal's selected gait pattern (see Jacobs et al., 2014, Current Pain and Headache Reports). Be sure to mark in your notebook each time you induced the animal to move so that you can account for these effects, if necessary.
- Methods to induce movement
- Moving the animal to the opposite end of the arena.
- Crinkling a paper towel at the opposite end of the animal enclosure sometimes peaks the animal’s interests and induces it to move.
- Use of a food enticement
- Place a dark box at one end of the arena.
- Methods to induce movement
- Record suitable gait trials (See "Identifying a Good Gait Trial” blog post).
- We have found that the animals are active mainly for the first 10 minutes they are in the arena, and continue to be active if placed in the arena later with at least a 30-minute break. If you need to put the animal back in the arena later to collect more trials, make sure to note the time you put them back in and out.
- Record in the notebook any notes, such as the animal’s mood, the tester’s mood, noise in the testing facility, abnormal temperature swings, and any physical abnormalities (excessive porphyrin, inflammation, etc.). Environment factors, such as room noise, lighting, and temperature, are particularly important, and can make rodents relatively lethargic and inactive.
7. Cleaning up
- After use with each animal, use water to wipe down acrylic sheets and remove any debris that may be obstructing the camera’s view.
- Do not use aromatic cleaners between trials unless absolutely necessary. Strong aromas in the arena can also affect animal participation and activity.
- When cleaning the arena at the end of testing or for storage, use citrisolve or other acrylic-safe cleaners to thoroughly sanitize the arena's enclosure and floor. Please note that direct application of alcohols to acrylic may lead to cracking.
